Lighting Controls
Vū Studio communicates with lighting fixtures via Art-Net through your Vū One system. You can control brightness, color, and presets for individual lights or groups — all from the same interface you use to control your displays.
Accessing Lighting Controls
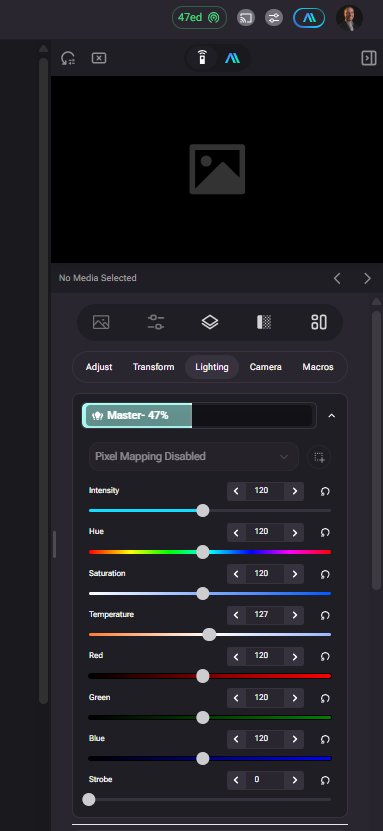
Lighting controls are located in the right-side slide-out remote in Vū Studio — the panel that slides in from the right edge of the screen when you're connected to a player.
- Connect to a player in Vū Studio
- Open the right-side slide-out remote by clicking the arrow tab on the right edge of the screen
- Below the media preview, click the Lighting tab
- The lighting controls for all configured fixtures appear below
If the Lighting tab isn't visible, check that lighting fixtures have been configured for your system. See Lighting Control Setup → or contact support.
Light Types
Vū Studio uses Art-Net as its lighting protocol — any fixture compatible with Art-Net can be used with the system.
When you purchase a system from Vū, it includes a hardware device that converts Art-Net to the appropriate signal for your fixtures:
- DMX — wired output to fixtures via standard DMX cabling
- CRMX — wireless DMX output, for fixtures that support wireless control
Vū Studio currently supports two lighting profiles:
- HSI (Hue, Saturation, Intensity) — for color mixing fixtures
- RGB (Red, Green, Blue) — for direct channel control of color fixtures
Individual Light Controls
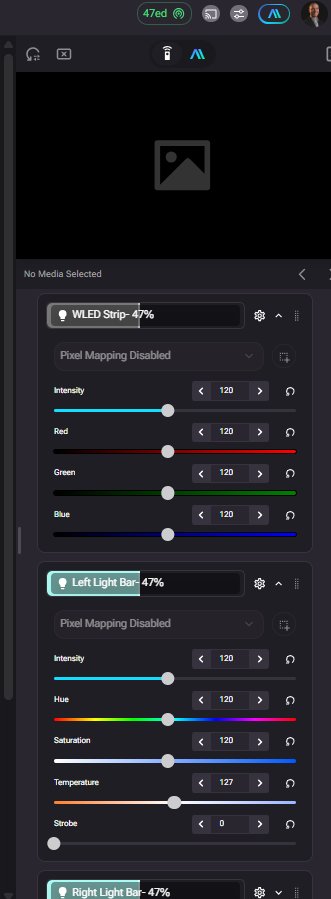
Each light fixture appears as a control card in the Lighting tab. Depending on the fixture type, available sliders include:
- Intensity — overall brightness (0–255)
- Hue — color hue for HSI fixtures
- Saturation — color saturation
- Temperature — color temperature
- Red / Green / Blue — direct RGB channel control
- Strobe — strobe speed (0 = off)
Each slider has a numeric value display and left/right arrow buttons for fine adjustments. A reset button (↺) restores the channel to its default value.
Master Control
The Master control at the top of the Lighting tab scales all lights simultaneously. It shows the current master percentage (e.g. "Master- 47%"). Pulling the Master to 0% blacks out all lighting; raising it restores everything to its individual settings.
The Master control is useful during virtual production shoots — you can instantly dim all practical lighting when switching backgrounds without touching individual fixtures.
Light Groups
Group related lights together for faster control. For example:
- "Stage left fill" — all left-side practical lights
- "Ceiling wash" — overhead ambient lights
- "Wall backlights" — LED strips behind the LED wall
Changes to a group affect all lights in it simultaneously. See Light Groups → for setup details.
Lighting Presets
Save the current state of all lights as a preset for instant recall. Presets are scene-aware — you can assign different lighting presets to different scenes and they switch automatically.
To save a preset:
- Set all lights to the desired state
- Click Save Preset in the lighting panel
- Name the preset
To load a preset: click its name in the presets list.
Pixel Mapping
For any connected Artnet/DMX lights, Vū Studio's Pixel Mapping feature lets you extend your screen's color output to surrounding lights — creating an immersive "halo" effect where the lights in your space mirror the colors in the on screen images for a truly immersive effect. See Pixel Mapping →.
Scene Integration
Lighting settings are saved as part of scenes. When you load a scene, the lighting snaps to that scene's saved state automatically. This makes it easy to set up complex production looks in advance and switch between them in one tap.